RED DOTS
 You will see red dots called “reference points” that are placed on “components” (hands, cross, rose etc). They are also placed at the bottom center of a “lettering group” be it a single line or 150 lines.
When you want to do something with a component or lettering group your place you mouse on the red dot and “right click” (click the right mouse button once). This is the only time in the program that you “right click”. With the right click, an edit window will appear giving you options of edits. In lettering, you can EDIT (change the lettering, panels, justification and more features) MOVE (move the lettering group) DUPLICATE (copy the group to a different location and then change the names but keep everything else with the group the same. Play with this one as it’s a time saver. ERASE (gets rid of if). The following are for use with only components ROTATE, SCALE, FLIP (Try this one), REPLACE and ADD LETTERING (if you are adding lettering within the confines of a components drawn area, choose this function, then place the mouse
LETTERED MONUMENTS
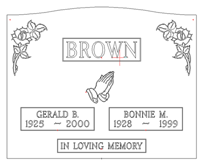
Right click on the RED dot of the Family Name. Left Click on edit. Change the family name by typing in the name you would like displayed on the monument. Click on OK. It’s that easy!
BLANK MONUMENT
A couple of blank dies and markers are in the demo package. Double click on the Monu-Cad symbol on your desktop and double click on “MCLite” in the dropdown window and select “D30x24sp” and click on “open”. A blank monument is now on the screen.
Type: CP = Component Place and highlight MYROSE2 and click “place”. Move the mouse with the component attached to the top left corner on the monument and left click to place or draw it. If you don’t like where it is, “right click on the “reference point” and move it.
Type: SG = Snap to Grid This makes the cursor jump to an invisible grid. You can adjust the size of the grid in the SNAPS pull down menu. This lets you put the cursor on an exact spot and view it at the bottom right of the screen. X (x 12.00 shows 12.0 inches to the right of center, -x shows 12.0 inches to the left of center) the factor Y shows how many inches up from the bottom of the monument you are, say 14.0 inches.
Type: CP again and select MYROSE2 and put the cursor on the red dot of the first rose BUT DO NOT CLICK THE MOUSE. Look at the XY numbers at the bottom right. Lets say they read X=-14.5, Y=22.5
Type in the co-ordinates (you see this going in at the COMMAND> bottom left) 14.5 (no minus sign as we want the rose on the plus or right side of center), (put a comma – it separates the X from the Y) 22.5 The line should read COMMAND> 24.5,22.5 (no space) Press the “ENTER” key. But it’s facing the wrong way? Right click the reference point and left click on “FLIP”.
Put the cursor where the family name should go and “right click”. Highlight “Add lettering, “Type in the family name, give it a size, give it a “normal” panel “single line” MAKE SURE the X reads 0.000 and click on “OK“. Do the same for the inscription panels and maybe an “IN LOVING MEMORY” at the bottom. You have just designed your first monument on a computer. IT’S THAT EASY.
Go ahead and play. You can’t hurt anything. Call Dan if you need help, that’s what we are here for. But Most of all… have fun.